

Ken Ellis
Luthier


© Whippoorwill Acoustics LLC, 2015-2023

by Ken Ellis
Autoharp
players
have
a
bad
reputation
among
other
musicians
for
always
being
out
of
tune.
The
appearance
on
the
market
of
inexpensive
chromatic
tuners
made
it
much
easier
to
keep
an
autoharp
in
tune.
So
we
no
longer
have
an
excuse.
While
it
is
true
that
36
or
37
strings
take
longer
to
tune
than
the
4
to
8
strings
on
most
string
instruments,
it
is
also
true
that
if
you
keep
your
autoharp
in
tune,
it
will
tend
to
stay
in
tune.
This
will
significantly
reduce
the
amount
of
time
you
have
to
spend
tuning
and
also
help
you
to
stay
in
tune during a long jam or performance.
You
may
be
surprised
to
find
out
that,
no
matter
how
accurate
a
tuner
is,
it
takes
more
than
a
tuner
to
really
get
an
autoharp
in
tune.
To
help
you
understand
why
this
is
so,
the
first
part
of
this
article
will
describe
how
strings
vibrate.
If
you
are
in
a
hurry
to
get
tuned,
you
may
skip
the
first
part
and
go
directly
to
the
second,
where I give two step-by-step methods for accurate tuning.
Strings
When
a
string
is
under
tension
and
is
pulled
to
one
side,
the
tension
pulls
the
string
back
toward
its
at-rest
position.
The
mass
of
the
string
gives
it
momentum,
however,
so
it
does
not
simply
return
to
rest
but
overshoots.
At
this
point
the
tension
acts
on
it
to
reverse
its
direction,
then
the
process
repeats,
causing
the
string
to
vibrate.
The
higher
the
string
tension,
the
stronger
the
restoring
force,
and
the
faster
the
string
attempts to return to the center of its motion. Thus a higher tension produces a higher frequency sound.
When
plucked,
a
string
vibrates
at
multiple
frequencies
simultaneously.
The
fundamental
frequency
has
a
wavelength
that
is
twice
the
length
of
the
string.
This
frequency
usually
determines
the
pitch
of
the
note.
The
higher
frequencies
are
called
partials.
The
partials
have
shorter
wavelengths
than
the
fundamental.
There
are
an
exact
number
of
half
wavelengths
of
the
partials
between
the
ends
of
the
string.
When
the
frequency
of
a
partial
is
an
integer
multiple
of
the
fundamental,
it
is
called
a
harmonic
of
that
frequency.
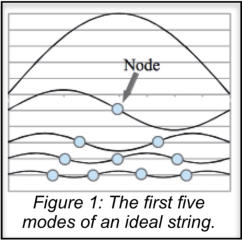
Figure
1
shows
how
the
string
would
bend
if
it
could
vibrate
at
only
one
frequency
at
a
time. The harmonic and the first four partials are shown.
For
every
frequency
there
are
locations
on
the
string
where
the
vibration
is
zero
for
that
frequency.
These
points
are
called
the
nodes
of
that
frequency
and
are
represented
as
dots
in
Figure
1.
The
nodes
are
separated
by
one-half
of
the
wavelength
of
the
frequency.
Every
frequency
has
a
node
at
each
end
of
the
string.
There is a YouTube video that is a great illustration of how strings vibrate:
<div class="player-unavailable"><h1 class="message">An error occurred.</h1><div class="submessage"><a
href="http://www.youtube.com/watch?v=8B6jOUzBKYc" target="_blank">Try watching this video on
www.youtube.com</a>, or enable JavaScript if it is disabled in your browser.</div></div>
In this video you can see the partials of the guitar strings while it is being played.
You
probably
already
know
that
a
video
only
produces
the
illusion
of
movement.
It
does
this
by
presenting
a
series
of
still
pictures
('frames')
in
rapid
succession,
so
rapid
that
your
brain
can't
keep
up.
You perceive
motion
when
an
object
changes
position
in
a
series
of
frames. Videos
are
recorded
by taking
a
series
of
frames
in
rapid
succession.
If
the
frame
rate
is
high
compared
to
the
speed
of
moving
objects,
they
will
appear to be frozen in each frame. The effect is equivalent to 'freezing' motion using a strobe light.
In
the
video
the
strings
sometimes
have
a
partial
at
a
frequency
that
is
close
to
a
multiple
of
the
frame
rate.
The
strings
then
appear
to
vibrate
at
a
frequency
equal
to
the
difference
between
the
partial's
frequency
and
the
closest
multiple
of
the
frame
rate.
When
this
difference
is
zero
or
very
small,
the
strings
appear
to
be
stationary
or
slowly
moving.
You
typically
only
see
one
partial/mode
at
a
time,
while
the
string
is
actually
vibrating in many modes simultaneously.
Ideal Strings
An
ideal
string
is
perfectly
flexible.
Its
fixed
ends
can
also
pivot
freely.
The
frequencies
of
the
partials
of
an
ideal
string
are
exact
multiples
of
the
fundamental
frequency,
making
them
harmonics.
You
can
hear
a
partial
if
you
touch
a
vibrating
string
at
one
of
the
nodes.
This
damps
out
any
frequency
that
does
not
have
a
node
at
that
point.
Try
plucking
a
string
rapidly
as
you
lightly
run
a
finger
from
your
other
hand
along
the
string. You will hear a range of tones, with the partials growing significantly louder as you approach a node.
Non-Ideal Strings
Real
strings
are
not
perfectly
flexible.
They
have
a
stiffness
that
increases
with
frequency.
Higher
frequencies
encounter
more
stiffness
than
lower
frequencies
because
they
require
bending
the
string
to
a
tighter
curve.
The
stiffness
increases
the
restoring
force
on
the
string
so
that
it
moves
back
towards
its
at-rest
position
faster
than
it
would
have
due
to
string
tension
alone.
This
produces
“inharmonicity”
which
shifts
the
frequencies
of
the
partials
slightly
higher
than
those
of
the
true
harmonics,
each
partial
by
a
different
amount.
It
is
usually
desirable
to
have
similar
string
length
and
tension
for
all
strings
on
an
instrument.
The
only
way
to
achieve
this
is
to
increase
the
mass
density
of
the
strings
in
order
to
get
the
lower
notes.
If
you
simply
increased
the
diameter
of
the
string
to
increase
the
mass
density
for
a
bass
note,
the
lowest
strings
would
be
so
stiff
that
the
inharmonicity
would
be
annoying.
It
would
also
become
difficult
to
pluck,
requiring
much
more
force
than
the
lighter
strings
and
making
the
instrument
harder
to
play.
For
this
reason,
we
use
wound
strings
for
the
bass
notes.
The
winding
increases
the
mass
density
significantly
without
a
significant
increase
in stiffness.
Tuning
Autoharp
strings
are
relatively
stiff
due
to
their
short
length
and
relatively
large
diameter
(compared
to
guitar
strings,
anyway).
Thus
inharmonicity
is
more
apparent
in
autoharps
than
other
instruments.
This
can
cause
problems
when
tuning,
and
is
probably
a
factor
in
why
Bryan
Bowers
developed
his
tuning
method
to
be what it is.
Bryan
starts
with
a
rough
tuning
with
a
chromatic
tuner.
He
begins
with
the
lowest
note
and
tunes
the
same
note
in
all
the
other
octaves
before
proceeding
to
the
next
note.
By
tuning
strings
that
are
spaced
far
apart,
the
stresses
on
the
harp
body
stay
reasonably
balanced
throughout
the
tuning
process.
This
not
only
prevents
a
possible
catastrophic
structural
failure
(which
would
be
bad),
but
also
makes
it
easier
to
keep
the
harp
in
tune
later.
There
may
be
around
1800
to
2000
pounds
of
tension
in
the
strings
of
an
autoharp,
so
you can imagine that tuning all the strings on one side of the harp first could put a lot of stress on the box.
When
he
reaches
the
end
of
the
first
octave,
Bryan
isn't
done
with
the
rough
tuning.
He
continues
up
the
scale so that the strings in the second octave get tuned twice and those in the third, three times.
After
the
rough
tuning,
Bryan
slowly
plays
arpeggios
of
each
chord,
listening
for
individual
strings
that
don't
sound
right
within
the
chord.
When
he
finds
a
note
that
doesn't
sound
right,
he
plays
a
different
chord
containing
the
same
note
to
ensure
that
a)
he
has
the
right
string
and
2)
retuning
doesn't
throw
off
its
sound
when
played
in
other
chords.
Sometimes
a
string
sounds
out
of
tune
because
the
string
next
to
it
is
out
of
tune.
Listening
to
two
chords
that
contain
the
presumed
out-of-tune
string
will
catch
this.
Finally,
he
plays
a
song or two to make sure that each note sounds correct in the musical context in which it will be played.
Now
a
chromatic
tuner
will
tune
the
fundamental
of
each
string.
However,
when
tuning
two
strings
separated
by
an
octave,
you
are
really
matching
the
fundamental
of
the
higher
one
to
the
first
partial
of
the
other.
If
the
lower
string
has
noticeable
inharmonicity,
the
higher
string
will
need
to
be
raised
in
pitch
slightly
to
match
it,
making
it
sharp
relative
to
the
chromatic
tuner.
I
believe
that
this
is
one
of
the
things
that
Bryan
is correcting when playing chords/tunes and listening for out-of-tune strings.
I
really
like
Bryan's
tuning
method,
but
unless
I
am
changing
strings
I
usually
modify
it
as
follows.
Because
I
am
often
impatient,
I
usually
don't
want
to
tune
strings
three
and
four
times
with
the
tuner.
After
the
first
time
through
all
the
strings
during
rough
tuning,
I
will
go
back
to
the
strings
in
the
octave
in
the
middle
of
the
harp
(these
would
be
the
doubled
strings
on
a
diatonic
harp)
and
tune
them
again
with
the
tuner
to
make
sure
that
the
changing
stresses
during
the
rough
tuning
did
not
pull
them
out
of
tune.
This
gives
one
in-tune
string at every note in the scale.
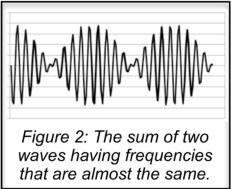
Now
when
two
notes
are
not
quite
in
tune,
the
sound
waves
will
add
together
as
shown
in
Figure
2.
We
hear
the
note
(the
high
frequency
in
the
figure)
modulated
by
a
“beat
frequency”
(the
low
frequency
envelope
in
the
figure),
so
that
it
has
kind
of
a
“wah-ooh-wah-ooh”
sound.
The
beat
frequency
is
equal
to
the
difference
in
the
two
frequencies.
As
the
two
notes
are
brought
into
tune,
the beats slow down. They go away when the frequencies are exactly the same.
When
tuning
a
diatonic
harp
I
tune
the
second
string
in
each
unison
pair
to
the
first
by
adjusting
it
until
the
beating
between
notes
is
inaudible
(to
me,
anyway).
For
both
diatonic
and
chromatic
harps
I
then
walk
up
the
scale,
tuning
the
same
note
in
all
other
octaves
to
the
one
in
the
middle
octave
before
proceeding
to
the
next
note.
If
you
have
a
quiet
room,
you
can
hear
the
beat
frequency
between
the
fundamental
of
one
string
and
the
first
partial
of
another
that
is
tuned
an
octave
lower.
You
can
tune
the
string
that
is
not
in
the
middle
octave
to
eliminate
the
beat
frequency.
I
find
it
helps
to
pluck
the
lower
string
first
since
the
fundamental
tends
to
die
away
faster
than
the
first
partial.
Strings
above
the
middle
octave
may
need
to
be
tuned
a
little
sharp
relative
to
the
tuner
in
order
to
compensate
for
inharmonicity,
and
those
below
the
middle
octave
a
little
flat. After
tuning
all
strings
to
the
middle
octave,
I
go
through
the
chords
and
play
a
tune
per
Bryan's
method and only occasionally need to do additional fine tuning.
I
only
use
beat
frequencies
to
tune
octave
intervals.
You
can
tune
other
intervals
with
this
method,
but
that
only
works
well
for
a
single
key
harp.
This
is
because
a
perfect
interval
in
one
key
is
not
an
exact
musical
interval
in
all
other
keys
(hence
the
need
for
the
even-tempered
scale).
Tuning
to
exact
intervals
will
also
put
you out of tune with respect to fretted instruments, which assume even temperament.
It
is
common
for
people
to
have
trouble
tuning
the
bass
strings,
even
with
a
chromatic
tuner.
There
are
various
reasons
for
this,
which
I
won't
go
into
here.
Warren
Fisher
recommends
that
if
you
have
trouble
tuning
the
bass
strings,
touch
the
center
of
the
string
when
plucking
it
to
suppress
the
fundamental
and
get
the
first
partial,
then
tune
the
partial
using
the
tuner.
An
alternative
trick
is
to
pluck
the
string
near
its
end.
This
causes
the
partials
to
be
stronger
and
the
fundamental
to
be
weaker,
but
can
make
it
easier
for
the
tuner to determine the vibration frequency.
Postscript
So
there
you
have
it,
the
why
and
how
of
getting
your
autoharp
in
tune.
I
encourage
you
to
follow
one
of
these
tuning
methods
before
you
play
your
autoharp.
Then
nobody
can
complain
that
you
are
out
of
tune.
I
also
encourage
you
to
tune
after
you
are
done
playing
for
the
day.
If
your
autoharp
is
in
tune
when
you
put
it
away, it will be much less work to tune it the next time you want to play!
© Ken Ellis, 2015. All rights reserved.
Return to Resources Page
How to Accurately Tune Your Autoharp